Graveyard Chocolate Pudding Cups are a real lifesaver when you need a quick and easy Halloween treat that gets the kids wide-eyed and giggly. I can’t tell you how many Octobers I’ve panicked, realizing my kid’s school party was next day. These pudding cups totally saved my bacon. All you need are a handful of simple ingredients and about 15 minutes, and boom, you’re MVP of class snacks. If you love easy sweets like this, you might also want to peek at my chia seed pudding with fruit recipe for a healthier switch-up too.
History / Fun Fact
Okay, so, pudding cups themselves are not some ancient tradition, but Halloween brings out the creative spirit in everyone, right? I first spotted graveyard chocolate pudding cups at a neighbor’s fall festival — I think the “dirt and worms” name is what stuck with me. It’s been a staple on Pinterest since, maybe, the dawn of Pinterest.
The fun thing is, there’s no strict recipe. Basically, if you can turn a snack chocolatey and spooky, you’re golden. Kids honestly love smashing cookies and drawing “RIP” on cookies with messy icing. I mean, who could blame them? It’s pure edible fun, and the graveyard chocolate pudding cups have sort of become a Halloween icon, at least in every school I’ve been part of.
Ingredients
Here’s what you’ll need for classic graveyard chocolate pudding cups. Spoiler: nothing fancy or mysterious.
- 1 box (about 3.9 oz) instant chocolate pudding
- 2 cups cold milk (any kind works)
- 1 cup whipped topping (like Cool Whip)
- 1 sleeve chocolate sandwich cookies (Oreos are the classic)
- Gummy worms (absolutely essential)
- Oval cookies (like Milano, for tombstones)
- Black decorating gel (for writing on tombstones)
- Clear plastic cups (for the classic “you can see the dirt” look)
Cooking Time & Tips
Look, you don’t need a ton of time or mad skills for graveyard chocolate pudding cups. It’s usually 10 minutes for setup, max.
- Mixing pudding is quick, about 2-3 minutes. Letting it set, maybe 5 more.
- Crushing cookies? Fun for the kids, like a five-star therapy session with a rolling pin.
- Layering is easy, but don’t let it get too pretty — the wobbly, messy look is totally part of the vibe.
If you want sharper-looking tombstones, pop those cookies in the fridge for a few minutes before writing on them. Oh, and don’t overthink the “dirt”; crumbs should be uneven. The messier, the spookier.
| Ingredient | Quantity | Calories (per serving) |
|---|---|---|
| Instant Chocolate Pudding | 1 box (about 3.9 oz) | 100 |
| Cold Milk | 2 cups | 150 |
| Whipped Topping | 1 cup | 50 |
| Chocolate Sandwich Cookies | 1 sleeve | 220 |
| Gummy Worms | For decoration | 60 |
| Oval Cookies | For tombstones | 80 |
| Black Decorating Gel | For decoration | Negligible |
| Total Calories (approx.) | 660 | |
Step-by-Step
Let’s do a no-nonsense walkthrough. You ready? Here’s how I do it:
First, whisk the instant chocolate pudding mix and cold milk until it thickens up. If you’ve got a few minutes, let it chill in the fridge for the best texture. Stir in the whipped topping to make everything extra creamy, almost mousse-like.
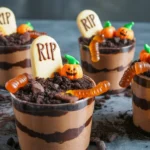
Next, get the cookies in a zip bag and crush them — I mean, really let loose — until you’ve got fine crumbs. Take your clear cups and layer in some pudding, sprinkle with cookie “dirt,” then add another layer of pudding and finish off with more dirt.
It’s time for the fun bit: Stick a Milano cookie in the pudding for a tombstone and use the black gel to scribble “RIP” on it. Press in a few gummy worms, poking out like they’re escaping (my kids love sticking extra in for good measure). That’s it. Total showstopper.
Nutritional Information
I get it. You might be thinking, “Is there anything remotely healthy about graveyard chocolate pudding cups?” Not really. These are sweet, a bit decadent, and made for fun, not clean eating.
You’re basically looking at sugar, dairy, and a dose of chocolatey joy. A typical serving is around 220-300 calories, depending on how generous you go with the toppings and toppings (I’m usually not light-handed, oops). They’re not allergy-friendly by default, given the cookies and milk, but you could swap if need be—see below for ideas.
Healthier Alternatives
I won’t pretend these are health food, but there are a few tweaks. Use sugar-free instant pudding mix, dairy-free milk, and a plant-based whipped topping if you need a lighter, allergy-friendly version. For cookies, try gluten-free brands. Toss in strawberries for a pop of “bloody” color if you want a little fruit.
And hey — if you’re all about swaps, you might even like these chocolate chip cookie dough truffles for a bite of indulgence with a bit less sugar. Feel free to tinker until you find your best fit.
Serving Suggestions & Occasions
Honestly, I can’t think of a Halloween party or fall birthday that isn’t improved by these cute cups. Some ideas:
- Pop ‘em on a tray for a classroom party snack.
- Make a mini “graveyard” centerpiece for your dessert table.
- Let the kids each decorate their own for a craft-meets-snack activity.
- Scale up for a giant bowl if you want a family-style version.
Adults don’t complain, either. Watch them “sample” the dirt as the kids run wild.
Common Mistakes
Surprisingly, even a “kid” recipe like graveyard chocolate pudding cups can trip you up. First, don’t skip chilling the pudding — warm pudding is just sad and soupy. Next, go easy on the crushed cookies or you’ll end up with mud instead of “dirt.” If you forget to dry the tombstone cookies after decorating with gel, they smear everywhere and the “RIP” looks more like “drip.”
The worst? Using cups that are too big. Trust me, nobody can finish an enormous cup of chocolate and cookies — okay, maybe some can, but I regretted it. Moderation means they’ll come back for seconds.
Storing Tips
Here’s the simple bit: you can prep graveyard chocolate pudding cups about a day ahead, just keep ‘em wrapped and chilled so the cookies don’t get weirdly soggy. Don’t put in gummy worms until you’re about to serve, otherwise, they get a little “melty” and lose their bounce. Tombstones can also get mushy if you make them too far ahead, so keep those on standby until showtime. They’ll last in the fridge for a couple of days, but these are best on day one for sure.
Common Questions
Q: Can I make graveyard chocolate pudding cups the night before?
A: Totally, just assemble everything but add the worms and tombstones just before serving.
Q: What can I use instead of Oreos for the “dirt”?
A: Any crunchy chocolate cookie will do the trick. I once used chocolate graham crackers and nobody noticed.
Q: Can I make them dairy-free?
A: Yup, just use plant milk and dairy-free pudding plus coconut whipped cream. The taste is still a crowd-pleaser.
Q: Can I let kids help make these?
A: Oh, they’ll want to. Mine fight over who gets to smash the cookies. Supervision for the mess though — trust me on this one.
Q: How long do leftovers keep?
A: About 2 days in the fridge. After that, things start getting a little… mushy.
Bring On the Halloween Fun: Try Graveyard Pudding Cups!
So that’s it — graveyard chocolate pudding cups are my tried-and-true, repeatably spooky treat for October. If you’re searching for the ultimate classroom or party snack, you absolutely can’t mess this up. For more fun dessert projects, check out these Graveyard Pudding Cookie Cups or make a batch of Spooky Graveyard Dirt Cups when you need an extra Halloween hit. Grab those cookies, let the kids loose, and enjoy every messy, chocolatey second. 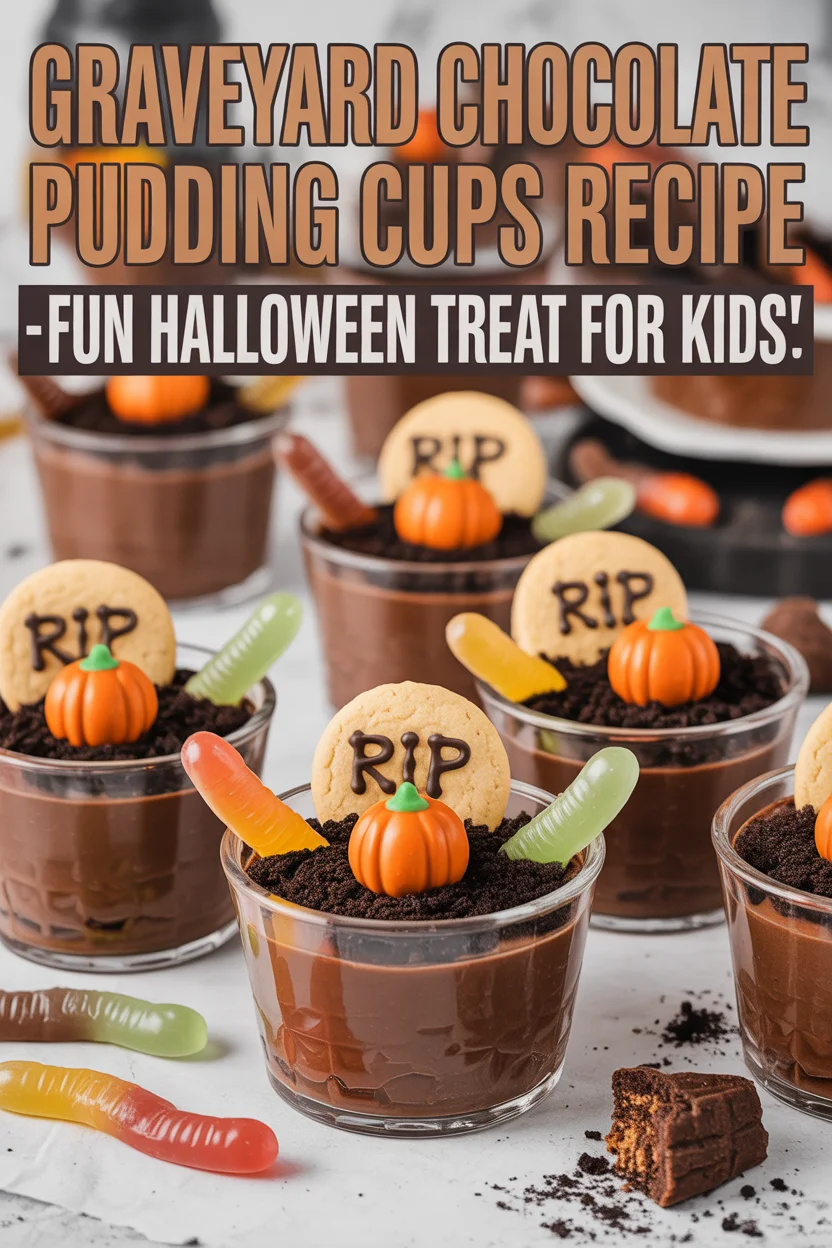
Graveyard Chocolate Pudding Cups
Ingredients
For the Pudding Base
- 1 box instant chocolate pudding (about 3.9 oz)
- 2 cups cold milk (any kind works)
- 1 cup whipped topping (like Cool Whip)
For the Decoration
- 1 sleeve chocolate sandwich cookies (Oreos are classic)
- 1 cup gummy worms absolutely essential
- 8 cookies oval cookies (like Milano, for tombstones)
- 1 tube black decorating gel for writing on tombstones
- 8 cups clear plastic cups for the classic 'you can see the dirt' look
Instructions
Preparation
- Stir in the whipped topping to make everything creamy, almost mousse-like.
Assembly
- Layer some pudding in clear cups, sprinkle with cookie crumbs for 'dirt', and add another layer of pudding, finishing with more crumbs.
- Insert an oval cookie in the pudding for a tombstone and use the black gel to write 'RIP' on it.
- Add gummy worms poking out from the cup to give a spooky effect.